Sunday, November 27, 2011

Solar Upgrade

The students begin disassembling everything
Earlier this year we did a blog entry looking back at our first ten years with solar power off the grid. We reported that we were very happy with our system overall, but highlighted a few improvements that could be made. These mainly related to the fact that our solar panels, batteries and inverter were located some 40 metres from the house. Over the past few weeks, with the help of our friend Jerry, (www.solarquip.com.au or email jerry@mooramoora.org.au), we have redesigned our system so that it is much improved.
Jerry checks the connections to our new smart regulator

Jerry is an experienced solar installer with wide experience in solar and small wind installations. He also teaches an off grid renewable energy course at Swinburne TAFE, and used our job as a practical exercise for his students. This meant that all work was of the highest standard and we were able to “sit in” on the teaching which allowed us to expand our knowledge at the same time.  Many thanks to Jerry and his students for their excellent work.
Over 2 days we:-
       Moved the batteries and inverter into the back part of our workshop, which is attached to the house. This is a much better location because the batteries are protected from the elements (rain, sun, humidity) and are subject to a more or less constant temperature. As the workshop is part of our house they are also more secure and we no longer have to pay extra on our insurance policy because they are now covered by our contents policy.
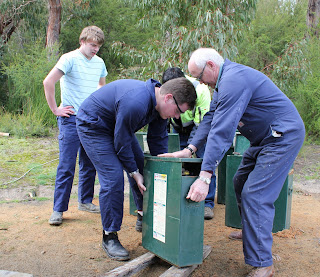
Those batteries are heavy!
       Built a battery box to house the batteries. This prevents unauthorised access to batteries and allows any fumes to be exhausted through a vent in the wall to the outside.
       Laid new thicker cable underground to carry the DC current from the solar panels down to the house
       Reconfigured the solar panel connections so they are now arranged in 3 panels per string (480w each) with a voltage of 110v DC. The higher voltage and thicker cable reduces losses in the system.
Reconfiguring the panel connections
       Installed 1 extra 160w panel which boosts the capacity of our solar array by just over 10%
Making full use of the machine!
       Installed an Outback maximum power point tracking (MPPT) or smart solar regulator. Our old regulator was a very basic “not very smart” device. Our new regulator is programmable and can monitor current flows to maximise solar gain in the system. It also allows us to program regular equalisation charges and provides a host of extra readouts including a 180 day history of how much power has gone into the batteries
       Upgraded all connections to current installation standards. Our initial setup was done prior to solar becoming “mainstream” and before installation standards had been set at a high level. The previous system had a proliferation of wires, little to no labelling and minimal protection fuses in the system. Jerry ensured this was all rectified, leaving everything clearly labelled and neatly set out.
       While we had the machinery here, we took the opportunity to run underground 240v cabling to our new garage for power points and lighting. We also installed a large pipe under the drive so that we can direct water from both sides of the driveway into our dam.
The new setup
We thoroughly recommend Jerry if you have the need for someone experienced in alternative energy installations . Apart from the quality of his work, he is happy to work within a budget, can sometime’s source quality second-hand equipment and is happy for clients to contribute some of the labour to reduce costs. Although based in Healesville, he does installations all over the state.
When getting quotes for a renewable energy system, there are huge benefits in choosing an installer with whom you can form a working relationship. Someone who not only has the expertise, but uses quality components, is reliable and whom you can call on for help if necessary. If you go for the cheapest quote or one of the larger alternative energy companies you may not get this.

Friday, November 18, 2011

Long Overdue Chai Recipe

So many people have asked me for the chai recipe that I use at the Healesville Organic Market and on our tours at Tenderbreak. I am more than happy to share it.

The amounts of ingredients I have written here are for quite a number of people...say at least 14 people, so adjust amounts according to roughly how many people will be drinking it. You can probably tell that I’m an “add a bit of this and add a bit of that” person!!!!!

My chai recipe doesn’t have any tea in it so it is caffeine free. Not all chai recipes have tea in them anyway.

Ingredients
·       Sticks of cinnamon
·       Green cardamom pods
·       Star of anise (whole)
·       Cloves (whole)
·       Bay leaves (your own tree or someone else you know may have one)
·       Fresh ginger (organic from our Organic Healesville market )
·       Chilli or cayenne (use own if you grow it)
·       Soy milk (Organic)
·       Water (we use our own tank water)
·       Honey (we use local Cathedral Valley honey from Healesville Organic Market.)
·       Piece of vanilla pod (if desire)

WHAT TO DO
 Grab a reasonably large stainless steel saucepan or pot.
Throw in:-
·       5 or 6 cinnamon sticks (broken up a bit with your hands),
·       One and a half handfuls of green cardamom pods,
·       a handful of star of anise
·       a sprinkling of cloves....say about a dozen or so
·       3 bay leaves (fresh or dried),
·       6 cm or so of fresh ginger root sliced.(if you are a ginger lover like me then adjust amount to your taste)
·       Pinch of chilli or cayenne (be careful with the amount of this as too much will overpower the brew and the tasters may gasp, choke and try to hide their streaming eyes!!)  

Now, cover the ingredients with water so that the water level is about 4 cm above the ingredients.
Bring to the boil and simmer with the lid on for 15 to 20 mins.
Turn the stove off. Leave the pot with lid on to cool down for a few hours or at least an hour. This will allow the flavours from the spices to infuse into the water.

When ready to make the chai, bring infused water back to the boil with added soymilk.  Add enough soymilk  (about 1 litre)  to the water to make a nice milky chai. I haven’t made this chai with cow’s milk but I’m sure it would be just as fine. When you add the milk, DO NOT put the lid on the saucepan, as it will froth up and boil over making one big mess!!

Don’t forget the honey!! I add about a good heaped one and a half tablespoonfuls to the brew. It’s up to you if you are more or less a sweet tooth. The chilli or cayenne can be added now or left out whichever you wish. Grating a little bit of whole nutmeg on top of the cup of chai adds that last exotic flavour!

As you may already realise, this recipe is just a guide for you as far as amounts go but with a bit of twitching and adjustment you will come up with your very own favourite version. One of the lovely things about this recipe is that you can keep topping up with more water and milk if people want more and your brew is running low. Remember to add a bit more honey if you are doing this.

Another great thing is that if you want chai another day from the same spices (say 3 or 4 days later) then drain off all liquid (don’t waste it ...drink it). Wash the spices in the sieve under cold running water, then store in an airtight container in the fridge. When you next want to use them, put into the pot, bring to boil, simmer for a while , let cool naturally for spice flavours to infuse ,then follow the original recipe as above.

A handy hint for pouring chai into your cups is ...use a soup ladle and pour through a tea strainer that you can perch on top of the cup.

Happy Chai drinking with family and friends!!!!!!!
Claire and Graeme enjoying a cup of chai at Healesville Organic Market

I wish to thank Linda George for happily allowing me to play around with her chai recipe.

Friday, November 4, 2011

Would you like a “Tenderbreak Experience”?

Over the past 12 months we have had many queries from people asking if we take on WOOFERS (Willing Workers on Organic Farms). So far this year we have been unable to take people on because our “WOOFER room” has been occupied by a friend. As our friend is moving out shortly, the situation has now changed. If you are interested in visiting for a few days (up to a week) have a look at the details below and contact us (tenderbreak@bigpond.com) for more information.
We are located at Dixons Creek, 65km from Melbourne. Our WOOFER room has a double bed and is suitable for a single person or a couple. Our usual arrangement is that board and meals are provided free in exchange for around 4 hours help daily (with occasional days off). Of course there will be plenty of opportunities to learn about permaculture and how it helped us design our property. Other areas that could make it a valuable learning experience include passive solar house design, sustainable living, off grid solar power, gardening, bushfire behaviour and much more. There are also opportunities for walks in the adjacent Pauls Range State Forest, bird watching and learning about our native wildlife.
This opportunity is definitely not a holiday and we are only interested in people who are genuinely interested in helping out and learning new skills as well as sharing their experiences with us. We always try and fit in with the interests of visitors. At this time of year the list of potential tasks include:-
·       Garden type tasks- weeding, planting, composting, watering etc.
·       Fire prevention activities and setting up our new woodshed
·       Small building jobs
·       Harvesting, cooking and preserving
·       Helping out with our tours and on our market stall
·       Looking after our chooks, ducks and dog
If you are interested, send us an email with some background information, your interests and what you would like to get out of a stay.
We are 20km from Lilydale Railway station and can arrange pickup/drop off if you don’t have your own transport.
PS. You can find out a bit more about our past WOOFERS by clicking the WOOFER link on the right side of our web page (www.tenderbreak.blogspot.com ).

Tuesday, October 18, 2011

Yarra Organic Coffee

A good friend of ours, owns Yarra Coffee (www.yarracoffee.com.au ). Helen and her family work hard to keep it going, and at the same time have a real commitment to sustainability and ethical business practices. She was really enthusiastic and supportive when we asked if we could utilise her spent coffee grounds. We now have an arrangement where we collect all the grounds from her Lilydale cafe each week and use them on our garden.
Coffee grounds are high in nitrogen, and make an excellent fertiliser for fast-growing vegetables. They also contain calcium, magnesium and potassium and can be lightly raked into the soil, or added to water and used as a soluble plant food. They are particularly good to use with plants that prefer slightly acidic conditions such as blueberries. In the general garden, spread small amounts in each application and avoid plants that don’t like acidity.
Coffee grounds may also help reduce damage from slugs and snails. Apparently they are repelled by the grounds and if the caffeine is absorbed through their skin it has fatal results. We’ll do a post reporting on our experience later in the year.  Some people go even further and mix up a special batch of strong coffee for use as a foliar spray to protect plants. There would have to be a lot of plant damage for us to give up our cup of precious Yarra Coffee to use it as a spray. We’ll probably stick to using the coffee grounds in the garden after drinking the coffee ourselves. Perhaps we are too addicted?
Like humans, worms also like coffee, and it promotes worm activity in both the compost heap and in the garden. As worms have no teeth they need to grind their food up, and use the coarse grounds as “grinding stones” in their gut.
A final benefit of coffee grounds is you get one last whiff of that tantalising aroma whilst you work in the garden. Unfortunately it doesn’t last all that long, before the coffee starts to break down.
PS: If you happen to be in Lilydale and would like to try one of Helen’s coffees or buy a bag of roasted beans, her shop is at 182 Main St., Lilydale- just up from the railway station. If you have a local cafe, try asking them if they would like to decrease wastage and recycle their coffee grounds.

Monday, September 19, 2011

Time for a Coffee Break


Morning Coffee Time

We have become rather addicted to coffee. Not in a “can’t do without sense” but in a “once a day, mid-morning coffee break” way. In fact it is more of a ritual than anything else, which we miss if we happen to be somewhere else. This is how it goes...
Freshly ground coffee beans
About mid morning our inner metabolism will use a subtle urge to prompt the brain that it is time for a break from whatever project we are working on. Heather will go inside and measure out the required amount of organic and fair-trade Yarra Coffee beans into our hand-cranked grinder. She will spend a minute or so grinding the beans into a fine powder, inhaling that irresistibly inviting aroma that freshly ground beans give up. In fact the gorgeous smell of freshly ground beans is as “heady” as the taste.
Percolating on the wood stove
She will then pop the coffee grounds into our percolator and place it on the hotplate of our wood stove for a few minutes. When it is suitably brewed she will pour out two cups and then we will sit for 15-20 minutes under our verandah. We sip, inhale the aroma, observe the world in front of us, chat, dream, philosophise and generally send out good vibes to the world. All this in no particular order, but in the main, it is an opportunity to stop and quietly enjoy those few minutes in time.  Then with renewed vigour and inspiration we get back to our project.
Watching the world pass by as we enjoy our coffee
Yarra Coffee sell a wide selection of coffee beans. Our favourite is the certified organic and fair trade coffee from East Timor. Apart from its superb aroma and flavour, it has reasonably low food miles compared to Africa or South America. And, after what the East Timorese have been through in recent years, they probably can do with all the support they can get.
Our hand cranked grinder

Monday, September 12, 2011

In the News Again

A few blogs ago we talked about reporter Natalie and photographer Lucy producing an article about our place to promote Sustainable House Week. Although they were confident the article would make it to the printing presses, we realised that other stories may take precedence on the day. Up until last week we had heard nothing so assumed our doubts were correct. That was until the phone started ringing, with people letting us know that the article had indeed been published. In fact it had been published in three different local papers (in the Fairfax Media Group) and what’s more we featured on the front page (in full grey haired glory)!
One result of all the publicity is that our tour on September 11 quickly got booked out, and we had to set up two more tours. The first of these on September 18 is now full and the one on September 25 has only a few places left. Let us know if you are interested in joining one of our tours and we will email all the details.

Wednesday, August 24, 2011

Our "Steamy" Adventure begins

Our “steamy adventure” is all about our desire to use a steam engine to provide backup power for our solar system. This dream began in our heads about 30 years ago but at last the real thing is getting underway.

Heather first became fascinated by the power of steam energy in her childhood. On holidays in the 1950’s, her family often set up their caravan near country rail lines. From these locations they frequently encountered steam locos being used to haul freight. Often, the family would make detours just to catch sight of a huffing and puffing train hauling its load along.
Much later (in the early 80’s), we read articles about innovative people using steam technology to generate electricity. A few years later, whilst visiting an alternative energy display, we came across Rod Mueller with a working version of his “Liberty” Steam Engine. By then we had purchased our bush block at Dixons Creek, and the dream of using our wood to drive one of Rod’s engines to generate power took shape.
A Liberty Stream engine in action
During this time, Heather and her friend Jean, decided to do a boiler attendant’s certificate with volunteer workers at the Puffing Billy Railway Society, in Belgrave. This involved hours and hours of theory as well as doing 300 hours of practical work operating steam engines to put the theory into practice. Although it was hard work, Heather enjoyed working with a variety of locos as well as the “Wattle” steam boat and steam engines being used for other purposes. Eventually we found out that Rod’s boilers did not need a qualification, as they had a surface area less than 40 square inches. But at least Heather developed a good understanding of how these machines work.
Rod builds the units at his engineering works in Goolwa, South Australia. Originally he started making boilers and engines for people who wished to install them in boats. Soon he was getting orders for machines to be set up to generate power, when people realised this potential use.  
Our boiler (with door) in Rod's workshop

Over the past 30 years we have not lost sight of our dream- however a multitude of things needed to be done first (building our house and setting up our gardens for starters). In more recent times one of the factors that held us up was the fact that setting up steam engines is quite complex and we were waiting for someone else to do it so we could call on their expertise if needed. Then last year some people in Healesville (about 30 min away) set one up. They kindly showed us their system and offered to help us if we needed it. At last we were ready. We took the plunge and ordered our very own steam engine. Over the next few months we will record our “steamy” story on our blog. Hopefully it will not take another 30 years to get it all set up.
For more information about Strath Steam’s products their web address is www.strathsteam.com  and Rod is very helpful.

Thursday, August 18, 2011

National Sustainable House Day

National Sustainable House Day (NSHD) is celebrating its 10th birthday this year on September 11. This annual event is held Australia wide and gives people the chance to visit houses that have been designed, built or fitted out with sustainability in mind and talk to owners, receiving unbiased advice.
For the first time we are running a tour of Tenderbreak Permaculture Farm as an ancillary event to Sustainable House day. This occurred quite by accident. We had already set September 11 as our next tour date and a friend suggested we link up with the local Sustainable House Day activities. We followed up this great idea and this lead to one of the local papers (Yarra Ranges Weekly) asking if they could include our place in a promotional piece they are putting together. So last week the reporter, Natalie and Lucy, the photographer came out and had a chat, a coffee and a short tour. The article should appear in the week prior to September 11.

If you would like to join our tour on that day you are very welcome. Bookings are essential as we have a limit of 20 people. The tour runs from 1:30 to 4:30 and the $15 per adult cost includes afternoon tea. Email us for more information at tenderbreak@bigpond.com. If you cannot make it on that day email us and we will let you know when the next tour is on
Of course there are plenty of houses open on that day in every state in Australia. Details of open houses can be found on NSHD website www.sustainablehouseday.com. If you live in the western suburbs check out Gavin’s house, which is a terrific example of how to incorporate sustainable ideas in housing, the backyard and most importantly in the way we live. See Gavin’s blog at www.greeningofgavin.com for more information about his place.

For more details about the tour of Tenderbreak see the “Ancillery Events “ page of the Sustainable House Day  website.

Wednesday, August 3, 2011

Solatube skylights


It lights up the stove area
As mentioned in the last post, our verandah works well, but it does reduce the amount of light coming in through the kitchen window. We deliberately chose narrow strips of opaque laserlite for the verandah roof to make sure we were not going to get too much heat in the summer. We have overcome the decrease in window light by installing a “solatube” in the kitchen ceiling.


This clever device “captures” light in its dome on the roof, and efficiently transmits the light through the roof cavity into the kitchen. We placed the solatube above the stove so the cooking area is now bathed in good light even on a dull day. The kitchen has ended up with about the same amount of light as before, but more strategically located.
Excuse the mess but look at the light

We installed another one in the garage and it lights up the area in the middle, that doesn’t get much window light. Solatubes are so good they even capture enough moonlight (when the moon is bright) to bathe the area in subdued light in the middle of the night. This is handy because we store firewood in the garage and do not need to turn the light on some nights.
The dome looks small but provides plenty of light
The solatube works so well, it took a few days to get used to the amount of light that came through the diffuser that is mounted on the ceiling. At a glance it looks like someone had left a light on, and our first reaction was to “turn off the light”. But of course the solatube is completely passive and works purely by capturing sunlight. If you are interested in looking at their display their website is www.diamondskylights.com.au .

Monday, July 11, 2011

A New Verandah

We always intended to have an undercover area outside the kitchen door. It is shown on our original plans as a future sunroom. However, time and money constraints meant it was put on hold when we started constructing our house in 1999. So up until this year we have existed without this key part of our house design.

Over the past 12 months we have focussed on developing a design for this undercover area that meets our needs (described in a previous post). The result is a multipurpose verandah (and pergola- yet to be built) attached to the northern and western walls of the house. We decided on steel construction largely because of the reduced fire risk but also because of the low maintenance, the wider spans that can be achieved and the ease of getting permits.
The verandah looks like it was always there.
As owner builders of our mudbrick house we gave serious consideration to doing the construction ourselves. However after thinking it through, we eventually decided to use a company that specialises in steel verandahs. Mike and Ken from Custombuilt Verandahs in Bayswater, did a great job. They worked with us to solve some of the complexities of the job and completed construction in a week (whereas it would have taken us several months). We are happy to recommend them.

We are now enjoying the benefits of the verandah (and wished we had built it years ago). Even now, in the middle of winter, it is very enjoyable sitting outside eating lunch or having a cup of tea as we look out over our garden and dam. The thermal mass of the mudbrick wall and the concrete patterned paving keeps the temperature mild (unless it is a cold wind). There are always dozens of birds to attract our attention in the garden, and our dog “Blue” enjoys watching them too as he reclines on the front door mat.

It looks spacious - but we have lots of ideas for using the area
The large undercover area has already proved to be quite handy as the weather gets colder and wetter. We have rigged up a temporary clothes line for drying sheets and given Blue plenty of exercise playing “fetch” with his ball.
We know that our verandah design works well in winter. We are now looking forward to seeing how it works in summer when temperatures climb to over 40 degrees. In the meantime we are working out the detail of the other ways to put this new space to work- but we will take our time doing that (between tea breaks).

Saturday, June 4, 2011

Good ideas badly implemented

Over the past few years we have been trying to get a new project off the ground. We are trying to convert our partly constructed barn into an “Interpretation Centre”. The term “Interpretation Centre” is not of our choosing. Construction projects in Victoria can only proceed if they are a “permitted use” within a particular land use zoning. We want to use our project to promote and teach Permaculture (topics to include energy efficient buildings, renewable energies, growing food, designing fire defences, sustainable behaviours etc). However, teaching facilities are not a permitted use in our particular zone, nor are host farms. After some searching we found the only heading that vaguely covered what we wanted to do, and that was “Interpretation Centre” – so that is what the project became defined as- on paper.

The planning scheme concept is an excellent idea. It aims to avoid inappropriate development eg. factories in residential areas, or high rise buildings shading out neighbours, or high density housing in conservation zones etc. To make sure clever developers do not “bend the rules”, all terms and concepts are precisely defined, and this has the unfortunate result of “locking out” good developments that do not fit the mould. Luckily for us there was an escape clause in the bureaucratic jungle and that was the magical term “Interpretation Centre”.

Of course bigger developers can often get around these restrictions because they have the resources (money) to spend on lawyers and planning staff who specialise in searching for ways to get around restrictions or know how to get them overturned.

The lesson we took away from this exercise was not to be put off by what looks like a barrier- dig deeper and you may find a way past the blockage.

The next hurdle we came across was Victoria’s 5 Star Energy Rating Scheme, which aims to ensure all new buildings reach minimal energy standards. Our planned “Interpretation centre” uses the same construction as our passive solar house, which has excellent thermal performance. Right now I am writing this at 10pm in June (early winter). The temperature inside is 19.8, whilst outside it is only 9 and we have not had our wood heater on for several days now. Even when it drops below zero outside, it never falls below 15 inside.

Generally we use our wood heater occasionally in May, more frequently in June, July and August and hardly at all in September. When we do use it, it is often just in the evenings and usually to create a cosier atmosphere when it is very bleak outside. The house does not need a lot of heating because of its large amount of thermal mass. The stored “heat” in the slab and internal mudbrick walls keeps internal temperatures from varying a great deal.

Our experience and the widely known performance characteristics of buildings of this type show that our “Interpretation Centre” will perform equally well thermally. We will be using very little energy to warm it (compared to conventional houses) and that energy will be renewable (using a wood heater) with fuel sourced from the forest area around our house (thereby reducing fuel levels for potential future wildfires). In summer, cooling will be via cross and stack ventilation. A well designed energy rating system would give our project full marks for its thermal performance and bonus marks because our systems are based on renewable sources. Not the Victorian system though. Its computer model takes into account the separate thermal performance of each type of building material, but gives very little consideration to the value of thermal mass. Nor does it appear to give adequate credit to other ways of reducing non renewable energy use such as shading of walls in summer, natural ventilation, using renewable fuel, gravity water systems, etc.

A quick way of evaluating whether the 5 star rating scheme is effective, is to measure the real life performance of some 5 star buildings. If they are using heaters frequently during autumn and spring or if they have an air conditioner, their thermal performance is questionable and so is the scheme.

So there we have it, two good ideas in principle but not always working too well in practice.

Thursday, May 19, 2011

Getting the Timing Right

The last few blogs have outlined our dreams for 2011. Over the past few days we have learned how important “timing” is, to successfully completing complex projects. Saving up the pennies, developing a design, planning the details and organising different facets of a construction are important steps, but when the work actually starts, timing can be a critical component too.
At the moment we are focussing on building our verandah, and setting up a clay pad for our garage slab to sit on. All the contractors (concreters, excavator and builders) were lined up well over a month ago, but  our bad timing started months earlier. Foolishly we thought that if we put our planning application in at the start of summer, we would be working on the projects in autumn (normally a dry time of year). However the wheels of the planning bureaucracy move very slowly. When we finally obtained the “magic piece of paper” 4 months later, each contractor then had to slot us into their work schedule. The builders were able to start quite soon, but the concreters had a backlog of jobs. Day after day of fine weather passed by, until at last the concreters were ready to do their thing.

The weather on 11th May, 2011 made it a memorable day. As storm clouds gathered, light rain began to fall. Kevin, our excavator driver, was going flat out to finish the clay pad before it became too sticky. Whilst trying to retrieve a log for part of a retaining wall he discovered a boggy patch that quickly turned into a substance like quicksand. The more he tried to “claw” his way out with the machine, the deeper it went. Using all his skills with the scoop, and by embedding the sought after log under the tracks of the machine, he managed to avoid becoming a permanent feature of our landscape. After this lucky escape, he did a bit more work to make sure rain would drain off the site and then shared lunch with us before packing up for the day.

The concreters turned up late (during the earthmover drama) because of two flat tyres on their machinery. They got to work setting out levels and using an electric jackhammer to chop back excess bits of the house slab that were in the way. As the cloudy conditions were putting very little solar power into our system we started up our generator. Unfortunately there was so much noise from the jackhammer and the excavator that we did not notice the generator cut out (due to low oil levels). For the next hour or so, the jackhammer happily ate into our precious store of power until the rain got too heavy. By now the concreters had had enough. So they packed up and went home too and we had to run the generator all afternoon to get some power back into the batteries.

The third minor disaster occurred in the afternoon. A glazier arrived to repair the windscreen (broken on another job) of Kevin’s Drott. He not only accidentally broke the new sheet of glass, but due to the wet slippery conditions dropped the original badly cracked pane on our drive. It took about an hour for us to pick up all the small slivers of glass.

By now the rain had really set in. We had also had enough of the conditions and retreated inside. Three days later it is still raining and work has ground to a halt.

The moral of this saga is to try and make allowances for all the potential holdups that could delay a project. In other words, “get the ball rolling” early, so wintry conditions won’t throw a whole lot of “spanners into the works”. With a bit of luck and good timing, holdups and muck-ups won’t be a big problem. At least for us, current predictions are for reasonably fine weather for most of this week before the next weather front moves in with an extended period of heavy rain. We’ll be flat out making the most of the blue skies if they do come our way!!!

Wednesday, May 4, 2011

2011 Dreaming -House Progress Report

This year we were going to get back on to the job of finishing off our owner built house. We have half-heartedly said this a few times before, but this year we have actually started. The first room to get the treatment was our bedroom. The job turned out bigger than we expected (don’t they always), because a close look our timber beams and wall cladding revealed that they needed further sanding before we could get underway. A full day was spent rectifying this situation before we could start the main game. Choosing colours is not one of our strong points so our bedroom was to be the site of the great colour “experiment”. We had a long chat with the folk at Grimes & Sons who are well known local manufacturers of stains and paints with a particular knowledge about mud brick construction.

We started off with a range of several “off the shelf” colours and these worked well for most of the room. However, it was not quite so easy choosing the wall colour and we ended up developing our very own tinted colour with the help and expertise from Alan Grimes. Our rather primitive method involved measuring out a quarter litre of the base colour and then adding drops of tint with an eye dropper until the colour was just right. The magical number was 50 drops. After that we used an old medicine glass to work out how many ml equalled 50 drops. As the final colour was a result of Heather’s experiments we have christened this colour “Heather”. Another colour that had a great name was the one that we used for the upright posts and main beams. It is called “beer”. We did not choose it because of its name, but because it is a rich mellow colour that makes the timber grain look really beautiful.

We have now finished our bedroom and are really happy with the result. Unfortunately the cooler weather is not conducive to painting and staining so we will try the next room when the warm weather returns. It is great that at last we have made a start.

Grimes & Sons have a web site www.grimesandsons.com

Monday, April 11, 2011

2011 Dreaming PART 2

The dreams described in the previous post continue here with a focus on the house

Verandah
We have always intended building an undercover area on to the front of the house where we can store boots, coats and umbrellas and enjoy a morning coffee or afternoon glass of wine when the weather is conducive. We have chewed over many different possibilities, and decided on an open sided verandah area that is roofed over with materials that let enough light in, without it getting too hot in mid-summer. This construction will extend around the side of the house and also provide space for the steam engine, boiler, heat exchange tank etc. This area will also have a small kitchen garden and an outside cooking area for those very hot spells we sometimes get in summer. We may even explore the idea of a wood fired pizza oven!

Our rough model of the shape of our verandah
One reason why our projects take so long, is we spend a lot of time mulling over different possibilities. It has taken us around 2 years to come up with the final concept. One of our problems was to come up with a design that fulfils all the functions we have in mind and at the same time fits in aesthetically with the house. This latter point is quite complex because where the verandah adjoins the building there are 4 different roof levels, 3 different wall corners and 2 different levels on the ground. Our solution is a bit complex so to make sure in our minds that it would work we constructed a rough real sized model. The model gave us the confidence to take the next step- which is to start getting quotes for the job.
The house
We moved into the house in 2001, so it really is time to finish off the sanding and staining of exposed timber beams and ceilings, sealing windows and rendering the mud brick walls. This will be our first project for the year. Hopefully we will report on our progress in a month or two.

Obviously we will not get every one of these projects completed by the end of the year (in fact we may not even get them all started). However we will be working on them as time and finances allow. By doing many of them concurrently we can maximise the use of machinery whilst it is here. Sometimes the hardest part is just making a start, and in a way, putting down our intentions in writing is the very first part of that. Anyway, it will be very interesting to see how far we get by this time next year.

Wednesday, March 30, 2011

2011 Dreaming ...

This year we have been dreaming of taking our permaculture design to a new level. We spent most of the last 12 years putting the core of our design in place, but there were several large elements that we didn’t get around to starting, and many, many details were left unfinished. This was not a bad approach as it gave us time to observe and assess how everything worked so far. We have now developed quite a large list of modifications and new projects that we are planning to start in 2011. It will be another busy year but we are excited by the thought that more elements of our permaculture plan will come to fruition. (Many of these projects were on our drawing board back in the 1990’s, so we have been very patient.)

Somewhere to park the car
We have a garage attached to our house. However for the last 10 years we have used it for a multitude
of other uses and the car only ever got a look in once. The garage space is just too convenient a workspace, so it has become a workshop where we house our tools and the materials that we need on hand. Our solution is to build a steel shed where we can keep our car and trailer parked undercover. However like most of our infrastructure it will have many more functions as well. We will attach our woodshed to it (see below), have extra storage areas and in the future we may use part of it for milking goats. The fact that it is 20m from the house and made of steel, means that in a fire situation, our cars will be under cover and we can store fuels away from the house. The cars will also be protected from hail damage. We have applied for the planning permit (a ridiculously convoluted and complicated process) and hope to commence building in the next few months.
The garage turned into an Art Gallery
New Woodshed
We have a wood combustion stove and wood heater, and soon will be the proud owners of a stationery steam engine that runs on wood fuel. (More on this in a future post.) Our existing woodshed is not quite big enough to develop a system where we can continuously store enough dry wood to run these three appliances. At present when we add more wood to our woodshed we have to shift the existing pile forward so we can add wood at the back, which gives it some time to completely dry out before we use it. We will relocate the woodshed to the side of the above garage and develop a system that ensures a continuous supply of dry wood.

Our existing woodshed
Hothouse
The hothouse will be relocated north of the new garage. This site is a bit more protected from wind, and allows us to water the plants with rainwater collected off the new garage roof. We can use the existing hothouse site to grow more nut trees and/or create an area for goats to graze.

Relocation of our solar system
The panels will stay where they are but we will shift the inverter and batteries down next to the house. This will necessitate the laying of a heavy cable but we will maximise the use of the trench digger, by laying electric cables to outbuildings so they can have an electrical supply.
Having the batteries and inverter under shelter and close by, will enable better monitoring, ease of maintenance, better security and should ensure they have a longer life. They will also be adjacent to our new steam engine setup, allowing for 24v input directly into the batteries.

Access Tracks
Our 400m driveway has coped very well over the past decade, but after the recent heavy rains it is in desperate need of rejuvenation. The main need is a grading of the surface to reform the camber and clearing out the gutters on each side. Regrowth after Black Saturday is seriously encroaching on both sides of the drive. Whilst we have the equipment on site we will also upgrade the access track to the solar panels. A non-flammable driveway surface will create a firebreak around the solar panels and improve our ability to hold back a fire on this side of the property should we ever need to do so again. This track would also provide vehicle access to our zone 2 gardens.

Interpretation Centre
We originally obtained building and planning permits to redevelop our old barn several years ago, but other events prevented us moving ahead with the project. So this is probably the biggest of all the jobs we have on our list and this year we hope to get the concrete slab in place and perhaps start infilling the mud brick walls.

Our list of dreams continues in the next post.....


Wednesday, March 23, 2011

HEALESVILLE AUTUMNFEST IS OVER FOR ANOTHER YEAR

All the planning and hard work was rewarded by perfect weather and a beautiful and very successful day with over 2000 folk turning up.


Crunchy Love Mobile Woodfired Pizza - YUM!

Zaar Belly Dancers

Edible Weeds from  Hello Little Weed

The moonlight walk was magical

Seed Savers

Solarquip had all the up to date info about alternative energy
Autumnfest had a huge “growth spurt” this year. It has matured into a celebration of the wonderful community that exists in Healesville and the Yarra Valley and is a result of the cooperation, help & support of hundreds of people. It aims to promote a healthier food supply system, display the work of community groups, showcase local talent, raise awareness of future alternatives & possibilities and of course to provide a pleasurable day of activities for everyone to enjoy. The highlight was the grand opening of the magnificent Healesville Labyrinth.

The "Smoking Ceremony" to open the Labyrinth
During the day we spoke to hundreds of people and were delighted by the positive feedback and happy responses. Thank you to all participants and all the visitors for helping to make it a lovely and special event. The photos show some of the day’s activities.

The colorful scarf run
Tenderbreak's colourful stall
The best news of all is that it will all be happening again next year on March 24. If you want to join in as a stallholder or volunteer or just be kept informed about the event, keep an eye on this blog or send us an email and we will add you to our mailing list.

 
Free Hit Counter